Before we start, a quick note on the photos. Most of these were taken at
the right time during the job, however some weren't, either because I was too
covered in grease to pick up a camera, or I clean forgot at the time. Where I've
realised I needed a picture of something I've either used a section of another
photo, or I've gone back and taken one at another time. This means that
some photos show other bits in them that shouldn't be there at
the point in the job they refer to.
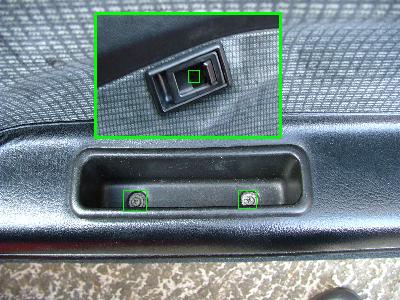
Step 1:
Undo & remove the inside door-release
handle surround, this is held on by a single cross head screw, and on a
Mk1B also remove the finger well in the armrest (two more crosshead
screws). |
 |
Step 2:
Remove the triangular plastic cover on the
inside of the wing mirror. Take great care when doing this as there are
three fairly brittle clips holding this on. Prise it away from the bottom
edge first, and then be careful with the top clip, that's the dodgy one.
|
 |
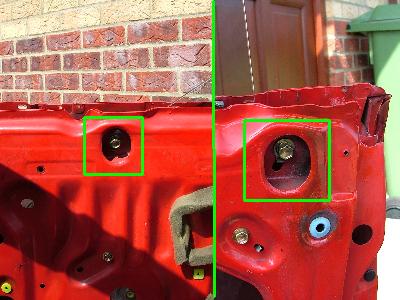
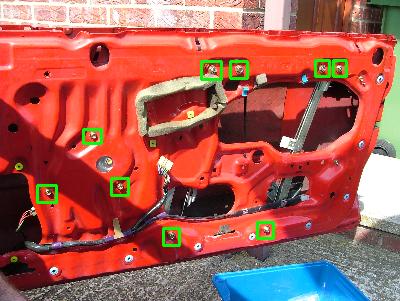
Step 3:
Remove the inner door trim, this is
secured by screws and clips. On a Mk1B there are four screws (shown in
green boxes), three through the door pocket (buried in the carpeted bit),
and one 2/3 of the way up the door at the front (behind a cap). The Mk1A
has only two screws nearer the middle of the door.
The clips (green
dots) are approximately every six inches along the bottom of the door and
up the sides. Pull the trim towards you, to pop each clip individually.
Once the clips are released the trim lifts up off the top edge of the
door.
Unclip the window switch wires before pulling the trim away from
the door. There's only about 8" of wire.
Note: picture shows
various bits that should have been removed. |
 |
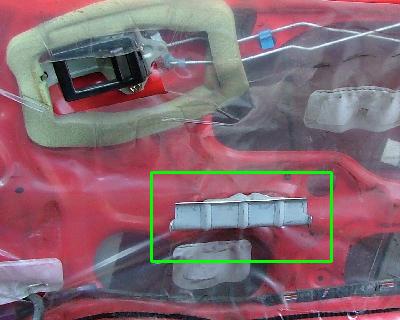
Step 4:
On a Mk1B you then need to remove the
bracket the finger-well screws to. This is held on by two screws. |
 |
Step 5:
Undo the two screws retaining the electric
window relay (but don't disconnect it yet), and then carefully peel the
plastic damp-proofing screen from the door. Beware of the black goo they
use to stick this to the door, it gets everywhere. White spirit will clean
it off, but it can be useful to re-stick the screen after the job is done.
|
 |
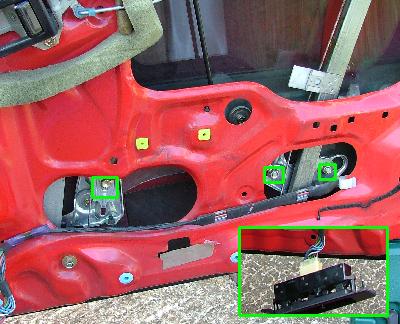
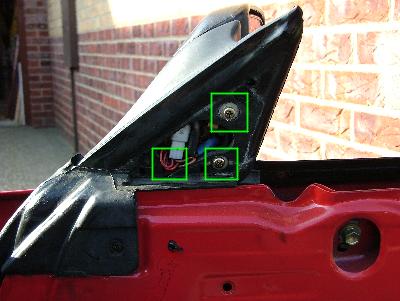
Step 6:
Reconnect the switches to the wiring
loom see insert (unclip them from the trim first) and move the
window so the nuts (green boxes) retaining the glass can be seen in the
lower door holes. The switches and relay can now be disconnected and put
to one side. |
 |
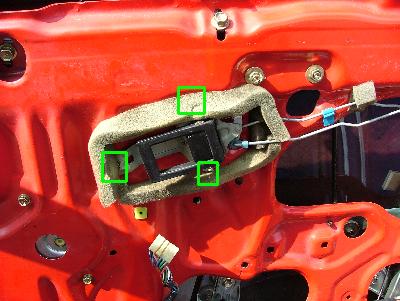
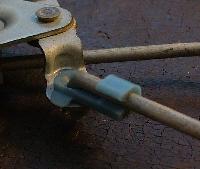
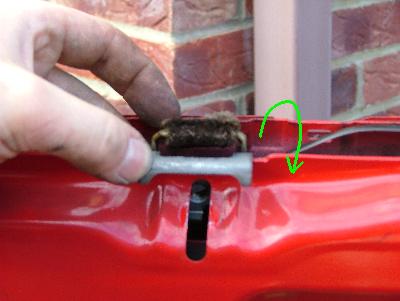
Step 7:
Remove the inner door-release handle and
link rods. The handle is held on by three bolts, two of which are obscured
by the foam surround. The rods should be disconnected at the 'lock
mechanism end', nearest the back of the door. A clip secures the bent end
of the rod through the hole. Undo the clip from around the rod and rotate
it through 90 deg. The rod can then be pulled from the hole. See
below |
 |
 |
 |
 |
| This shows the type of clip, though the one's you'll be trying to
unclip won't be as well exposed as this one. |
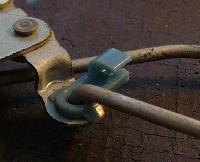
The first step is to unclip the clip from the arm in question. This is
possible, but suprisingly difficult to do with bare fingers. Give it a go,
but if you have no luck use a screwdriver blade to push with. You won't
hurt your fingers, but there is more risk of damaging the clip. |
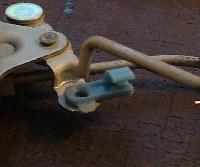
With the clip open, the rod can be pulled free of the clip and
whatever it is attached to. |
Optional
Step:
Undo the three nuts (See picture in Step 6) holding the window
glass to the lifting mechanism and gently rest the glass in the bottom of the
door. This isn't strictly necessary at this point, but it does give you more
room to work.
Step 8:
Undo and remove the two upper window
stops. There's one near either end of the top of the door. |
 |
Step 9:
Undo and remove the wing mirror. This is
secured by three cross-head screws on the inside of the door. In the whole
job these were the only screws I had difficulty with. Mole grips proved
useful here. To separate the mirror from the car you need to unclip the
wiring connector located by the screws. |
 |
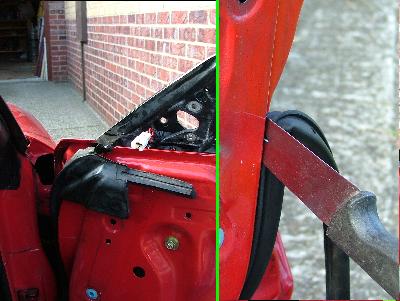
Step 10:
Remove the rubber door seal. This is held
on by two screws at the back, a screw and a plastic stud fitting at the
front, and many plastic studs round the edge. The studs round the edge are
'T' shaped, with the bar inside the rubber trim and a ribbed peg going
through the door. It's easy to tear the rubber when removing these and I'd
recommend using a 'special tool' for the job. Mine was made from
an old carving knife I'd cut the end off and I then ground a 5mm wide slot
in the end with an angle grinder. The slot fits around the stud, so they
can be hauled out. This worked a treat. |
 |
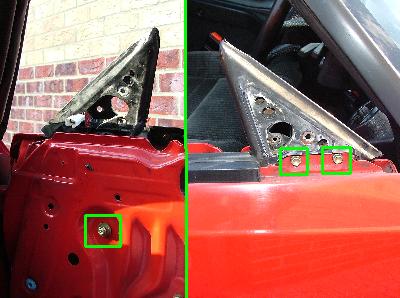
Step 11:
Undo and remove the wing mirror mount.
There are two bolts on the outside of the door, and one lower down on the
inside of the door. There is also a wiring connector to be unclipped low
down in the door (accessible through the hole the relay sat in) and a
cable clip to pop back into the door about half way up. Undo all these and
the unit can be lifted out. The bolt at the bottom will only fit through
the gap where the forward upper window stop has been taken from. (See
Step 8) |
 |
Step 12:
Remove the outer black window rubber
trim. This is held on by a cross head screw at either end, and a series of
annoyingly brittle clips along its length. Take care not to bend this if
you're going to be using it again, they don't straighten well. |
 |
Step 13:
Remove the two felt pads that guide the
window glass up and down. These rotate out, over the top of the door edge.
Until you've taken the outer window rubber off (Step 12) there's
not enough room to do it. |
 |
Step 14:
Remove the
glass, if you hadn't previously, undoing the three nuts that hold the glass to
the window lifter mechanism. There is no need to remove any of the fittings from
the glass, they will all fit through the hole in the top of the door. Then lie
it flat somewhere, or your neighbours cat will knock it over for you.
Step 15a:
Remove the window lifter mechanism. This
is held on by three bolts round the motor and three nuts for each of the
vertical guides. Remove the two plastic clips that secure the cables to
the door frame and disconnect the wiring connector that is accessible
through the relay hole. The clips and connectors are best undone first as
they can be tricky to unclip once the rest is unsupported. |
 |
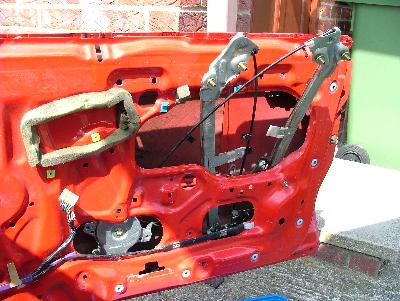
Step 15b:
Once everything's undone the whole unit
can be manhandled out of the large hole in the door. It takes some
jiggling, but that's how it comes out. Take care with the cables, they
don't work well if kinked. |
 |
That's the worst of it done....
Step 16:
Remove the lock linkage pivot. One bolt
to undo and a rod to disconnect. |
 |
Step 17:
Remove the door handle. The handle itself
is secured with two bolts, and it's linked to the catch by two more rods.
The door opening clip works the same way as all the others, it's just
scaled up.
Photo taken after links to lock had been removed.
|
 |
Step 18:
Remove the door latch. This is secured by
three screws through the rear edge of the door, and one bolt through the
inner edge of the door. There is one final wiring connector to unclip and
then the catch can be lifted out. |
 |
Step 19:
Remove the wiring. The wiring bundle
comes through a hole in the front edge of the door. The hole has a plastic
insert that needs to be removed. Unclip the loom along it's length. The
wiring can then be pulled out of the door through the hole. All the
connectors and clips do go through it, there is no need to cut the wire.
|
 |
Step 20:
Removing the rubbing strip, if you need
it. We're back to my favourite special tool, the carving knife. The strip
cuts away from the door quite easily, don't let it drop away from the door
as you're doing it though. It is worth taping the ends down after you've
cut in from them, because if the strip falls and bends the backing can
crack and delaminate, rendering it useless. Mk1A's have particularly tough
adhesive for the first inch or so, making them harder to cut free, the B's
are easier. |
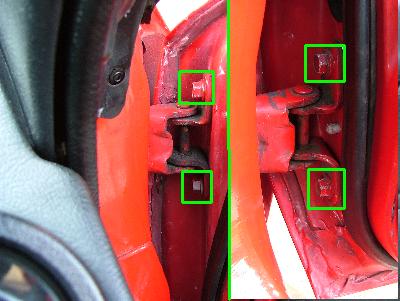
 |
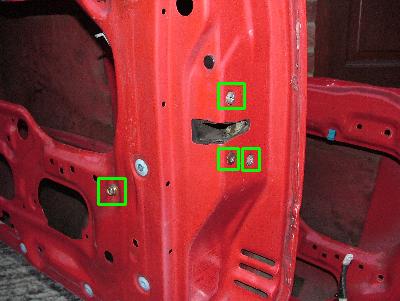
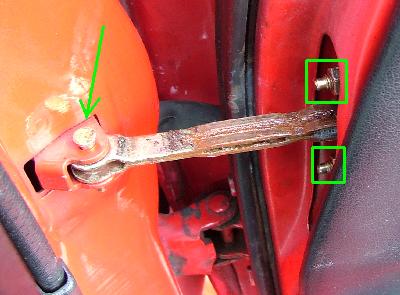
Step 21:
Remove the retaining bar. The retaining
bar needs to come off before the door can be removed. Lift the pin out of
the joint at the car end, there is a retaining clip underneath you'll need
to 'persuade' off first. The main unit is then unbolted from the door by
removing the two nuts that fasten it to the edge of the door. It can then
be taken out from inside the door, through the hole the window relay sits
in.
Note: picture shows various bits that should have been
removed. |
 |
Step 22:
Remove the door. Starting with the bottom
one, remove the bolts securing the hinge to the door. As you undo the last
one you'll need to support the door, or get someone else to. But at least,
at this point, it's not that heavy anymore.
Note: picture shows
various bits that should have been removed. |
 |
Step 23:
Cup of tea.
Re-fitting is, as ever, the same thing backwards. Take the chance to
hoover the bottom of the new door out, and spray liberally with Waxoyl (or your
preferred treatment). Setting up the window though, needs a little more
explanation:
Setting Up The Window
Assuming you've got everything re-attached with the window glass bolted to
the lifters in a central position (there are marks on the brackets to indicate
where this is), this is how you do it.
- Before you put the plastic sheet on, temporarily reconnect the relay and
switches so you've got control of the window again.
- Wind it halfway up.
- Whilst pushing the glass out so it just touches the outer window rubber,
adjust the felt guides (Picture Step 13) so they now just touch the
inside of the glass.
- Next fasten the upper glass stops (Picture Step 8) in position,
(start low) and wind the window up. Move the stops up as necessary until the
window reaches the right position. (The leading edge should line up with the
wing mirror mount, and the top should be true to the door seal with the door
closed.) This might take a few goes to get right.
Now, the Mk1 window is designed to open and close with a slight twisting
action at the end of its stroke. This helps it make and break the seal with the
rubber more easily, and gives you a tighter fit.
To get this to happen, now that the glass stops in the right place, adjust
the front bracket (where the glass is fastened to the mechanism, picture
Step 6) until the front edge of the glass hits its upper stop with the rear
end still 5-10mm lower than its stopper. There is a cunning spring-loaded
'slack' section in the system that will allow the rear to continue to rise that
last bit after the front has reached position, twisting the glass into place. As
the window is lowered, the reverse happens. The rear edge drops away from its
stopper first and then the front will start to move.
Levelling a Door:
These cars are getting old, the doors have seen a fair bit of use and the
pins are starting to wear. Really the only solution is to replace the hinges, as
there doesn't seem to be the facility to adjust the position. I have
'cheated' slightly though, in order to cure a door where the latch didn't
cleanly strike. You might want to do the same if you're having to swing the door
closed hard to 'bounce' it onto the striker. All I did was fit a couple of
washers between the lower hinge and the door, which has the effect lifting the
back of the door slightly. (In addition the door will end up that much nearer
the back of the car, which affects the gaps between the door and the panels,
but not much.) The door is so long in relation to the vertical distance
between the hinges, that there's a lot of height to be gained for very little
backwards movement.
Notes on door types:
Mk1A doors and Mk1B doors are not identical, but it's not
disastrous. The door off a B has four extra holes in it for fittings used to
secure the trim panel. Consequently you can use a Mk1B door on an A with no
difficulty, but to put a Mk1A door on a B you'll need to make the extra holes
and fit the plastic fastenings in. Unfortunately these holes are square, so it's
out with the files. I found laying the new door trim in place and marking the
spots through the trim was accurate enough for the positions. Drill them out
using the largest drill that will fit through the final square hole, and file
out some corners.
In either case keep hold of the plastic fittings that fasten your
door trim. Even though the Mk1B door has the holes for the Mk1A
fittings, it doesn't have the same ones, and the pop studs round the edge are a
different size from the A to the B. So, before you sling your old door, strip
all the plastic connector bits off it.
Uses for old doors:
- Sledging
- Novelty rabbit hutch roofs
- Taking up space in the garage.....
- Tripping over
- A conversation point with your other half, as in "When are you going
to do something with that...."
Karl Thomas, SE Region
Back to repairs index page
Back to main page