THROTTLE CABLE
This is an article on how to replace your throttle
cable for only £5 and 1 hours work. My cable had started to fray quite a while
ago but it had started to get a lot worst just lately, occasionally not going
completely off, keeping the revs at about 2000 rpm until I hooked the pedal up
with my foot. The price for a new one was about £78 + vat. I thought s** that.
I found a secondhand one for £30 which was not quite perfect but was there if I
needed it. This was days before I was going to Wales
for a holiday, no surprises there eh. When I got back home I looked at how much
of a job it would be and once again I thought s** that and started to find an
easier way to do it. Eventually I found a motorbike shop that sold the inner
cable of the right size and some screw on nipples, one the same size as the
engine end and one as big as they had, about twice the size as the other one.
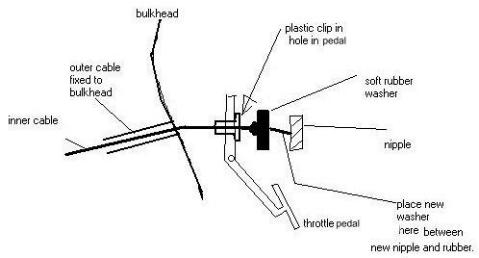
Then came the scary part as I cut the nipple off the engine end and thought to
myself no going back now. After pulling the cable out from the pedal end saving
the rubber washer it was just a case of screwing the big nipple on the end of
the new wire placing a washer with a hole the size of the wire in plus the
rubber washer back on and then threading the wire back through the pedal. After
screwing the adjusting nuts almost right back on the engine end outer cable and
pulling the inner cable tight it was then time to cut it to length and fit the
smaller nipple on. After fitting the cable back on the round throttle pulley it
is important to make sure the outer cable end is lined up with the inner cable
pulley, this can be adjusted by gentle bending of the cable bracket until the
inner cable does not rub on the outer cable as it slides through, this should
prevent the cable from wearing out again. Final adjustment can now be done in
the usual way. It might be wise to check the nipple tightness after a few miles.
This job took me about 1 ½ hours mainly because I found lying on my back (oh
happy memories) in the foot well was a bit of a pain, so I reckon a fit person
should be able to do it in a hour which is a lot quicker than putting a whole
new part on and a lot cheaper, the cost of the bits was only £5. My car seems
to be ok but any problems with it I shall put in the next magazine. The picture
should make things a bit clearer I hope.
THROTTLE CABLE 2
It is now a week since I changed my cable. Everything
was going fine but I was not completely happy with it so I have made it better.
Luckily I had left a spare 2” of cable sticking out at the pedal end so all I
had to do was move the large nipple 1” towards the end of the wire. I next
removed the engine end nipple then removed the throttle bracket from the car,
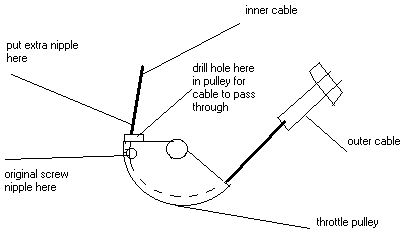
it’s only held on with 3 bolts. Then all I did was drill a hole for the inner
cable to pass through in the folded over flange of the round cable pulley. This
lets the inner cable go right through the nipple and pulley so you can fit an
extra nipple outside the pulley. Hopefully the diagram will make it clearer.
This should make it twice as strong so the cable cannot pull out of the nipple
when being used. I also put a double nipple on the throttle pedal end.
Also I have been hearing about rattling drop links. I
had a look at mine recently as one ball joint was starting to be noisy. All I
did was use a sewing machine oiler, the small plastic type with a screw on
nozzle filled with grease. I made the hole in the nozzle larger then inserted it
into the rubber gaiter to squeeze grease into it. This completely stopped all
noise. I am now gradually doing all my drop links this way even though they are
all ok. Give it a go it might be all they need.
ISABEL FROM LOUGHBOROUGH
First published in the September 2004 issue of the club magazine