TIMING BELT REPLACEMENT
This particular job seems to strike fear in many owners minds. I've heard
stories of horrendous bills from main dealers, and tales of a 'really difficult
job' etc etc.
Well having seen it done last week by club member Paul Woods, it's a job that
should hold no real fears for a competent DIYer. In terms of time it can be done
in about an hour - but this is with experienced hands, all the right gear, and
bits that aren't too stubborn to get off. For us mere mortals, allowing at least
half a day would be somewhat wiser.
I'll describe how do do it below but firstly why should we do it at all?
Well these toothed rubber belts have quite a hard time driving the camshafts
round, especially on a high revving engine such as the 4AGE. Could be worse
though, Thank god the back of the belt doesn't have to also drive the water
pump, a common 'cheap and nasty' modern car practice.
If the belt does suddenly fail then the camshafts stop dead - with some
valves inevitably being 'open' – and with the pistons still coming up rapidly to
meet them. On most modern cars this is 'instant death' for the engine, one or
more pistons will smash into the open valves causing 'heavy metal' carnage. On
the 4AGE and 4AGZEs in theory this shouldn't happen, there are small pockets in
the piston crowns to avoid this happening.
However, at revs above 7,000 I wouldn't put much reliance on this clearance
still existing!
So, when should these belts be changed? Curiously the Toyota BGB (Workshop
Manual) is a bit ambivalent on this, suggesting change at 72,000 miles. This
seems a bit optimistic for an engine that is going to see enthusiastic use, I
would say 36,000 miles/3 years is more than long enough between changes.
If you've just recently bought a car and don't have evidence of a recent
change - then do it soonest to be safe!
Now to the 'how' - but to keep this article to a readable length I'll only do
the key points in detail.
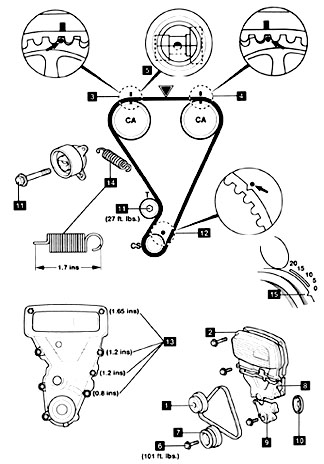
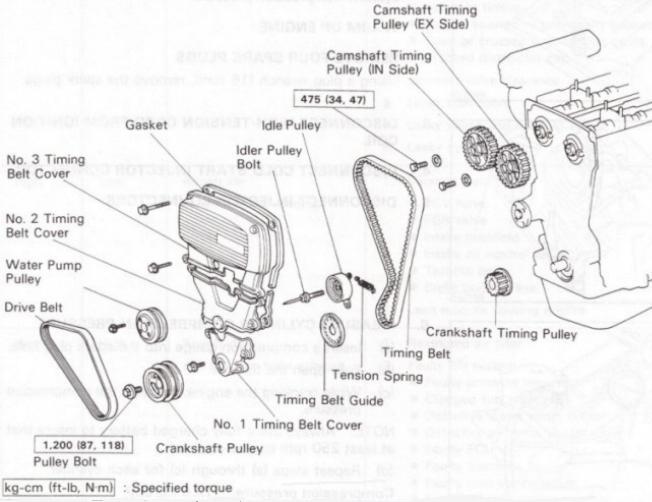
1) Remove the top cambox cover (plastic)
2) Crack loose the water pump pulley bolts. (Only do this if you want to
check the water pump - say if you have a overheating problem. This however is
for a later article, anyone with a specific problem here just contact me
anytime.)
3) Jack up the car and remove the right rear offside wheel. Support the car
on an axle stand on the bottom ‘wishbone’ suspension mount - carefully.
4) Remove or loosen the plastic engine undertray to get access from
underneath.
5) Get a trolley jack under the diff housing to support that end of the power
unit.
6) Undo the engine mounting - 2 bolts from above, one from below Use the
trolley jack to take the weight
7) Lower the trolley jack slightly so that the offside of the engine drops
slightly, this is to give access to the crankshaft pulley that needs to come
off.
8) Remove the crank pulley bolt, this can either be a dream or an absolute
bastard, and I've experienced both ends of this spectrum! Its held on pretty
tight, around 112 ft/lb in 'old money' which means its going to need a fair bit
of 'Weetabix' to shift it.
I've only done it the 'manual' way with a 'barring lever' to lock the pulley
spokes and a long 1/2" socket bar, and it was hard going for about 20 minutes.
Paul Woods used a compressed air impact wrench and it came off in about 2
seconds.
9) Remove the crank pulley, again this can be a dream or a real pig. This
pulley is mounted on a parallel crankshaft nose and is located by a distinctly
under-sized Woodruffe key. (This is a design weakness caused by the 4AGE being
an evolution from much lesser powered engines and they failed to upgrade this to
take into account the increased power requirements.)
Judicious levering and tapping often helps here - but gently - don't distort
the sump and only use at most a copper headed hammer, rubber or plastic are
safer to avoid cracking off the brittle cast steel pulley flanges.
If this doesn't work then a puller is needed and unfortunately there is not
enough room for a conventional 2 or 3 leg puller, the wheel arch gets in the
way.
Toyota as always quote an 'SST' for this (Special Service Tool) - which
probably costs a fortune, but one can be knocked up quite quickly by anyone with
basic drilling and MIG welding capabilities. The idea is to pick up on the 2 8mm
threaded holes in the pulley spokes and use them to pull the pulley of the crank
nose.
I am now starting to get that sinking feeling that perhaps my idea of 'DIY'
is perhaps a bit beyond that of some members. Nevertheless since I've started
I'm not going to stop, there must be some out there who might benefit from this.
10) Remove the lower and middle plastic cambelt covers.
11) Rotate the engine (clockwise only) to get the dots on the cam pulleys to
line up to the ridges on the metal back of the cambox cover If they don't line
up then some mechanic has screwed up and this happens rather more often than you
would like to know about! If in any doubt on this put paint dot match marks on
both the pulleys and the cover as a precaution.
12) Slack off the cam belt tensioner, this slackens the old belt off.
13) The old cam belt can now be removed. It needs to be threaded through the
gap in the engine mounting, hard to describe but obvious when you see it.
14) Thread the new cam belt through the same gap.
15) Engage the new cam belt onto the pulleys but do not upset pulley
alignment, if you do then realign and do it again, it will only take another 5
minutes.
16) Refit the tensioner - this is spring loaded - but once the spring has
pushed the pulley against the belt it has to be tightened ie locked up. In this
sense it is no longer spring loaded it is effectively a fixed tensioner.
Not my idea of the best possible design but it's simple and seems to work so
why knock it!
(Those in the know just gently nudge this pulley out when tightening the
locking bolt to give just that bit more tension on the belt. Do it gently
though. overtightening will cause problems. If in doubt don't bother.)
17) Refit the cambox covers.
18) Refit the crank pulley but clean the mating parts first, then give them
the lightest spray dusting of WD40 to prevent subsequent fretting corrosion.
19) Reset the engine mounting.
20) Refit the V-belt(s) to the crank pulley/alternator etc.
21) Test run and go and celebrate!
On reflection, I suppose this is not the easiest job in the world certainly
not one for a novice, but I would point out that this job is no harder on a MK1
than all the other twin cam engines in this world. Admittedly working space is
tight, and the engine mount juggling is a bit of a chore, but it's actually
easier than it sounds above - honest!
For those of a more nervous or distrusting disposition, then take it to a
good independent garage.
A few are advertised in our mag/web-site, and although I cannot personally
vouch for them other members seem to like them so they must be pretty good.
Unfortunately, most of these good outfits tend to be in the central belt of
England. We really need member recommendations for good independent garages from
Penzance to Inverness and beyond.
Then we might be able to establish a national database of garages where MK1
jobs can be done properly and at reasonable expense.
You know it makes sense so please help me in this, my details are at the back
of the magazine.
I look forward to contacts!
ALAN JONES
TIMING BELT
I recently changed the cam belt on
my baby and thought you would like to know how easy it was to do. I had spent
many sleepless nights and days thinking about doing it but I knew the time had
come as the engine had done over 45,000 miles since the last change. And as the
car is used every day I like to keep on top of everything. Anyway the day
finally came, I had got all my tools ready - or so I thought - bought a new belt
from the Toyota shop, one thing I recommend is that you do get original parts for, and a full
packet of fags to keep me going. Using the instructions in the manual it is
quite easy to remove the fan belt and water pump pulley also the top engine
cover etc. Setting TDC through the oil filler hole is easy using a spanner on
the crank nut to turn the engine. Now it’s time to go under the car to remove
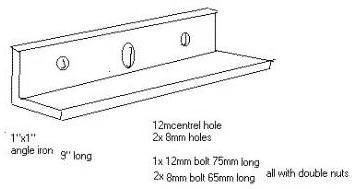
the plastic under cover and fly wheel cover. The next bit I found hard to do as
you need an bloody big long spanner and lots of strength to loosen the crank nut
and hold the flywheel still. None of my pullers would fit so I made one up froe
a piece of 1’’ x 1’’ angle iron about 9’’ long with a twelve mm hole
drilled central and two smaller holes each side to match the hole centres on the
crank pulley. Use the double nuts to turn the bolt against to slowly pull the
pulley off the crank. Every time you take a part off always do a quick drawing
so you know which way it goes back on. I have found you cannot trust your
memory, my memory anyway, to remember every little part. The next tricky bit is
to support the engine and remove the mounting bolts, easy eh? Wait till you have
to line them up and get them back in. Before taking the belt off turn the engine
by hand so all the marks line up, one in the oil filler hole, two for the cam
pulleys and one for the crank. I replaced the tension spring, as it is now 15
years old and only cost a bit. After the new belt is on turn the engine over by
hand, if it does not go freely check all the timing marks still line up. If ok
check all the marks are still spot on. I found it strange how the tensioner
works but felt happy to let the new spring do its job without me pushing it on
harder to make sure. At this stage you can relax a bit and admire how well
designed and built the MR2 is made. It is also a good opportunity to clean the
bits and places you cannot normally reach before finishing replacing all the
other parts. I felt very pleased when I started the engine up and knew I was
fully mobile again and ready for the next few thousand miles. I found this job
was very easy to do and say that you should not be put of doing it yourself, the
total cost came to only £38 and 3 hours work, not bad eh? My next jobs are a
complete brake check over and fit new rear tie bar rubber bushes. Another
article when ready.
ISABEL FROM LOUGHBOROUGH