Aerial Replacement - Non Toyota - Chris Bassett
The electric aerials on Mk1 MR2's don't last forever. Toyota
charge rather a lot for replacements, so this is my cheaper solution.
Since writing this article, I've found another website on the same subject.
You may want to read both as viewing the same subject from two perspectives may
make things a bit clearer. Click
here
Things you'll need: A fully automatic electric aerial - Electrical terminal
("chocolate") block - Wire cutters - Mole-grips - Pliers - Screwdrivers -
Cable-ties or insulation tape
Before you start: This procedure will cause the aerial to extend and retract
when the standard radio is powered on and off. The car that this was performed
on was a late spec 1987 model. Wiring configurations may be different for other
years.
Buy an aerial: A fully automatic car aerial can be bought from Maplin Electronics (code RJ98G) for about
£25.
Safety first: Disconnect the Negative (black) terminal on your battery.
Remove the boot lining: This is extremely easy, and can be done without
breaking any clips - something that Toyota themselves sometimes seam completely
oblivious to. To remove the fixings, simply push the centre pin in and then pull
the fixing out. You'll probably need to remove the rear, right and front lining.
Disconnect the old aerial: Coming from the front of the car towards the
aerial is a big bunch of wires. If you're lucky, this will be in the same state
that it was in when it left the factory - that is tidy and bundled up. There
will be a connector block coming out of this bundle of wire, and also the black
aerial wire itself. Disconnect the white connector block, and pull the big black
aerial wire out from the aerial (it may have got slightly corroded, so give it a
good tug).
Remove the old aerial: Time to get busy with a screwdriver, and unscrew
everything that connects the aerial to the car. Keep the screws and remember
where they came from! You'll also have fun unscrewing the aerial where it passes
through the car to the outside world. I can't remember for sure (oops, sorry)
but I think the chromed top bit unscrews. I had to get a pair of mole-grips on
this, but I think there's a tool that pokes into little holes in the top and
allows you to twist it that way. If you completely mess up the chrome bit, it
doesn't matter because it will all be replaced by the new one. Once you've
extracted the old aerial, pull off the rubber tubing from the bottom as you'll
need this for the new one. Put the aerial to one side - you shouldn't need it
again.
Get the electrics sorted: Now you'll need a pair of wire cutters. You need to
cut two wires going into the connector block as shown in Photo A. The wires are
Blue with a Yellow stripe (+12V supply) and Pink with a Blue stripe (aerial
up/down signal). Give yourself some slack with these wires by extricating them
from the tied bundle (you may need to cut the ties to do this, so once you're
done re-tie the remaining wires). The Maplin aerial has three wires (Power/Red,
Ground/Black and Signal/Green). The Red and Green wires are terminated with
crimp bullet connectors. Cut them off and bare back about 3mm of wire, twisting
the strands once you're done. Do the same for the wires you've cut from the
connector block.
Fixing the new aerial in place: Now this is where things start to get a bit
tricky. Supplied with the aerial kit you get a metal bracket which needs some
"adjusting" (I recommend using a pair of mole-grips and pliers for this). Take a
look at the Photos B and E to see how I bent the bracket. You'll notice that we
are re-using one of the screws from the old aerial to secure the metal bracket
in place.
Take one of the longer pieces of rubber tubing (saved from the old aerial)
and attach it to the water drain connector on the bottom of the aerial. Assemble
the top of the aerial as per the aerial instructions and fit it in the gap left
by the old mast (see Photos C and D). Cut the rubber tube so that it can attach
to the car water drain connector without any kinks (don't cut it too short!).
Ensure the aerial assembly is straight. Now attached the modified bracket to the
car, and tweak it so that it lines up with the fixing point on the aerial.
Secure the aerial to the bracket. If the bracket is not adjusted correctly, then
the aerial will extent at an odd angle from the car.
Just for the record, this took me numerous attempts. It isn't easy getting
the mast correctly aligned, and the connector at the top can be very fiddly.
Final connections: Now we can finish wiring the aerial up. Take your terminal
block and join together the Blue wire with a Yellow stripe with the Red wire.
Join together the Pink wire with a Blue stripe with the Green wire. Tie the
terminal block securely to the aerial bracket. Use the supplied nut, bolt and
washer to attach the Black wire from the aerial to the aerial bracket. See Photo
B. Connect the aerial leads up. Re-connect the battery. Give it a whirl. If it
all works, put the lining back. To re-use the lining clips, push the central rod
out so that it protrudes from the face of the clip. Insert the clip then push
the central rod back in so that it's flush.
All done!
Disclaimer: This is what I did with my car, but it may not necessarily be the
same process for your car. Check everything you do with the manual supplied with
your aerial. I take no responsibility for problems arising from aerial
installations that have gone wrong. Visit Chris's website at: http://www.basirk.com/mr2/
UPDATE 24/12/03 Peter Scatchard sent this:
Mine had experienced the ol' H2O problems, and despite my best efforts to
sort it, could not be persuaded to work reliably. Breakers proved of little
help, the price of a new one was beyond my means (and beyond a joke!), and the
cheaper after-market electric aerials are what can only be described as "nasty
bits of work". 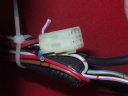 The connector block with the two wires cut
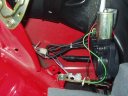
 Joining the two cut wires with the two aerial wires. Connecting the
Ground wire. Adjusting the mounting bracket.
Joining the two cut wires with the two aerial wires. Connecting the
Ground wire. Adjusting the mounting bracket.
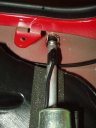 The mast from below
 The mast from above
 The complete assembly
I found the answer to a maiden's prayer in the form of an
aftermarket "bee-sting" whip aerial, sold for Vauxhall cars. The flared
black-plastic base neatly covers the entire OE unit's mounting hole on the rear
wing, the base is squidgy enough to conform to the slightly convex surface, and
the angle of the new aerial's base confers just the right angle of rakishness,
tilting it back at about 40 degrees off the vertical. The glossy black finish is
a perfect match to all the stock black trim items, conferring a very authentic
OE look to the assembly. Oh, and reception is fantastic!!