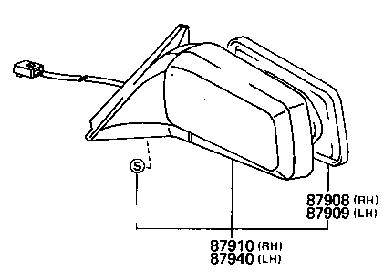
MIRRORS – OVERHAUL, REPAIR and COLOUR CODING
Remove triangular trim piece by prising off from the top, the plastic stud usually
breaks off.
Prise
out and disconnect electrical connector – use a small screwdriver to bend up the retainer.
Undo the three screws – if they are to tight for a screwdriver use a crosshead bit in
a socket or clamped in a pair of mole grips.
Remove mirror assembly and take to work bench.
Undo the small screw and bracket next to the wiring.
Pull off the rubber weather seal.
Undo the 2 screws to release the mirror housing from the bracket.
Using a screwdriver carefully prise off the mirror glass in its frame – do not worry
about the noise as the nylon studs are released from the motor gears.
Remove the 4 screws holding the motor assembly, lift out, turn over and remove the
screw holding the 2 halves together.
Release the top clip and separate the motor assembly, note the wiring connections and
pull the terminals off.
This now allows the wiring to be withdrawn and the bracket, the rubber and the mirror
housing can be separated.
(If the mirror will not operate, reconnect the wires and attach the connector to the
car to check operation. If a multimeter detects power at the connector but there
is no movement in the motors, replace the motor assembly)
Clean everything and replace, or spray paint if you want to colour code the mirrors –
if the aluminium bracket is corroded as is often the case use paint stripper to
remove remaining paint and smooth down with wet and dry before spraying a
special undercoat to seal the metal prior to the top coats of the body colour.
The colour code can be found on the vin plate attached to the inside of the front boot if your
Toyota dealer cannot identify the colour. 2002 update, most UK Toyota dealers say that MK1 colours are no longer available,
so you may need to go to an accessory dealer who has computer aided paint mixing facilities.
The plastic mirror housing should
receive an undercoat of paint suitable for plastic. Rub down or fill any
scratches prior to painting.