RESTORATION TOPICS - 'RESURRECTING THE DEAD' - ENGINE SWAP
My previous articles under this title have mainly related to bodywork
repairs - for the sad but true reason that many members cars now need them!
Equally though I realise that all members might not need 'chapter and
verse' on these repairs - especially if they contract them out to their local bodyshop.
So, this article is on mechanical matters of not inconsiderable
significance -swopping out a knackered N/A engine for an AE86 Corolla unit - very interesting as the latter are
quite commonly available.
First though - I must give total
credit for this to member MARC PALMER from Christchurch in Dorset - his own
article follows shortly.
My only role was to encourage him to do it in the first place and then
provide minimal advice as the job progressed.
It just goes to show what can be done with a bit of inspiration,
enthusiasm and effort - even with typically limited facilities. Well done Marc - you've scored a first!
So, without further ado Marcs excellent article follows - full of
educationally wry comment and humour - recommended for style alone!
RESURRECTING THE DEAD
An epic voyage of discovery and a wallet that knows no bounds!
Actually this article is a ”brief” account of an MR2 engine swap. The catalyst for this
drastic piece of D.I.Y. maintenance came about after the engine overheated and
boiled on several occasions.
The first episode happened whilst taking my wife to a job interview in Southampton.
Travelling through the New Forest from Christchurch the temperature gauge
rocketed, I stopped, steam billowing from under the engine compartment lid, the
RAC were called, diagnosis, the thermostat had failed and my wife missed her interview.
That was the start of a bad month. After getting home I changed the thermostat, bled the
cooling system and inspected as much as I could to see if the head gasket had
blown, etc. All seemed well.
With hindsight I think damage had been done because a few weeks later the car boiled
again. The cooling system may have developed an airlock because shortly after
closing the heater knob the temperature gauge rocketed again. Another bleeding
and minor service and all was well again. Then the head gasket popped.
WHY NOT JUST CHANGE THE GASKET THEN? You all say. Well, that was done two years ago, the
head was skimmed back then how far I don’t know but I believe there is only a
0.005” limit. So, not a lot!
The engine had also done 105K miles so I might as well just rebuild the engine, bearings and all.
So deep in thought as what to do, an opportunity arose to buy a Corolla GT Coupe of the
same age as my MR2. More importantly it was a runner, no MOT due to some small
rust patches but a suitable donor and at £150 it had to be the cheapest option.
Dad and I saw the car, it ran very well although it had covered 86K miles the
engine was very quiet and well worth the gamble.
Now to the Technical Bit:-
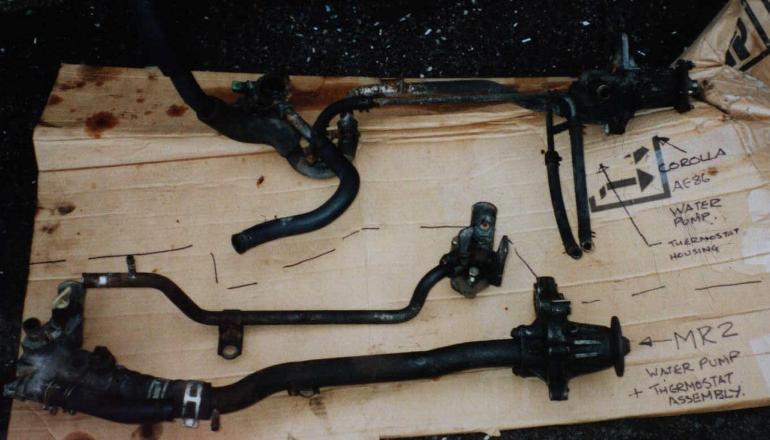
Both cars share the 4A-GE engine however; - all engine ancillaries are
different with the exception of the oil pump.
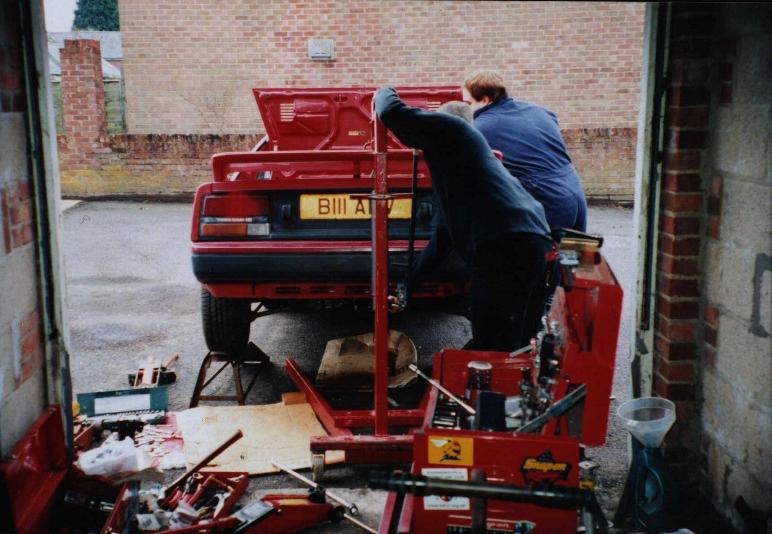
Firstly the MR2 engine had to come out, this was carried out between March and April
2001 outside my garage, which incidentally has no electrical power! I loosely
based the removal on the Haynes manual. So all the fluids were drained, all the
big bits were taken off, the exhaust and manifold, oil filter, the airflow meter
and brace bar, injectors and fuel rail, starter motor and alternator.
Having tidied up in the engine compartment cables wiring looms etc. The rear wheels
were jacked up onto the ramps. The drive shafts came out, the car was chocked at
the front wheels, the engine crane was attached to the engine (gear box mounts
were removed). Then carefully the gearbox/engine assembly with head and cam
covers fitted was lowered onto a collapsed cardboard box.
After disconnecting the engine crane the engine assembly was kept vertical but rotated
so that the gearbox was pointing towards the back of the car. We then pulled the
engine backward, it became apparent that the rear mount on the cross member
would have to come off and also the oil filter cap! Just to give an extra ¼”
clearance. The engine assembly came out with very little effort. The height
required to remove the engine assembly is 22 ¼” or more.
Remember that the front wheels are still on the ground! This may help with the
clearance due to the angle.
If attempting to do this and the engine still won’t clear, use the engine mount
near the engine compartment cooling fan and lift the back of the car with the
engine crane (trust me it works!). The Corolla GT Coupe or ‘AE86’ is RWD, making
for a very straightforward engine removal. This car is at my parents (thanks
Mum!), there are plans to revive this car but for motor sport later but that will be another story!
Dad had disconnected most of the hoses and cables that morning while John (my
brother-in-law), Dennis (best mate and extreme engineer) and myself removed the
MR2’s engine. This left the way clear to whip the engine out of the AE86 that
afternoon, which we did in an hour and a half! It took almost seven and a half for the MR2!
By late that afternoon I had two 4A-GE engines in my garage. This is where the fun
started! Both engines were systematically stripped down and the parts cleaned
and inspected, then it was time to sort out the gaskets and 0-rings that I needed.
There were a few things I wanted to do with the engine whilst it was out of the MR2, which were:
1. Inspect the hoses, Only the oil cooler hoses needed replacement, £27 each
from Toyoa, oh how I laughed! So the local motor factors came up trumps at £2
per foot – for the same type of hose.
2. The clutch slave cylinder, very easy to change
with no engine fitted. WARNING! Don’t try bleeding it without the engine and
gearbox in position or the piston will probably pop out.
3. Timing and fan (alternator) belts. The
cam belt is a doddle with the engine out; a puller was needed to get the crank
pulley off. I had to swap the pulleys from the MR2 engine to the AE86 because
the timing marks are different. The MR2 has 3 notches on the crank pulley, also
the tensioner pulley has a “pointer’ on the bolt. These are the timing marks.
The AE86 uses the 5, 10 and 15 degree marks
and one notch on its pulley for timing. The MR2 needs a different set up due to
poor visibility and access when the engine is installed, I guess.
4. The gearboxes had to be swapped anyway
and as far as I can tell both the MR2 and the AE86 clutches are the same but
don’t quote me on this! The flywheels are the same but the gearbox mounting
plates are not. So off came the flywheels, I managed to crack a 14mm socket
doing this, so use “IMPACT SOCKETS” wherever possible, as they are stronger. DO
NOT FORGET! MARK THE FLYWHEEL BEFORE REMOVAL SO IT CAN BE REFITTED INTO THE SAME POSITION.
All went well with the refit of the flywheel remember to torque the bolts in the
right order (see Haynes manual) and put a drop of thread lock on the bolts.
There is a ball race bearing in the centre of the crank on the AE86 engine, this is for
gearbox alignment, the MR2 doesn’t have one. However, I left this in as it is
difficult to take out and it helps to align the clutch plate.
Back to the engine component change, I bought a head gasket set, which was a bit of a
waste of money. I only used a few gaskets but I still needed other ones not in
the kit. A head gasket kit is about £80; a total engine gasket kit is £180! And
that’s not a Toyota price. I required a water pump 0-ring and 0-rings for the
oil filter housings, not to mention the copper gaskets and 0-rings for the
injectors and fuel rail. So I went to Toyota and got them. I realised too late
that the 0-rings and copper gaskets are bound to be a common size and can be
purchased at most motor factors. As yet I haven’t the old ones to prove this,
but I’m sure you don’t have to buy Toyota and maybe cheaper than buying a head
gasket set. I’m kicking myself for not thinking of it sooner!
The engine was coming along well, I managed to fit the gearbox on my own, but I
don’t recommend this because it hurt! But here we were, the engine was ready to fit.
My Dad and I used my Granddad’s 40-year-old scaffold poles and ratchet winch and popped
the engine back in! It took a bit of fiddling but the two of us got it in within
an hour and a half. It really was “the reversal of removal”.
With the engine now fitted I spent the best part of the day refitting all the ‘big bits’.
The refit went well and was actually easier with the car on the ramps. With
everything refitted I lowered the car, topped up the oil, bled and filled the
coolant, plugged all the electric’s and cables back in and went round and checked it all again!
Then the moment of truth, I turned the key, all I got was “click”. The starter motor had
died! It took me a month to get this far! B******S!!
Back in the air again, I removed the starter motor (reduction gear type) and then went
and ordered a new one. Yes I know the Corolla has a starter motor but it is a
different type. Things then got a bit complicated because the local motor
factors managed to get me the wrong starter motor twice! The Corolla type!
Apparently they are a straight swap. I must say I was a bit dubious about this.
My seventeen year old MR2 (mostly red) burst into life at the first turn of the
key. No fires and no leaks. I went to adjust the timing and discovered I had
fitted the distributor perfectly, it didn’t need adjusting, a bit of a fluke that eh!
The engine is sweet! Much quieter than the previous engine and it just wants to go!
All in good time, I have to build some trust again first.
Summary
I have learned a lot doing this; it has been fun at times and a right pain at others.
Working outside and in the cold and wet is not much fun but I feel there is
nothing I can’t do now. Attempting work like this for us DIY’ers takes time, so
be prepared, work from the Haynes manuals, they aren’t perfect but not bad. Also
don’t struggle, ask questions.
I have a personal loathing of buying parts from Toyota, and only do so in emergencies as
it often seems that they don’t want to know you. And will charge the earth in
the process. BLUE PRINT parts are authentic Japanese parts and no doubt are what
Toyota will sell you, but in a different box at three times the price, but
that’s up to you. Shop around.
I feel that I should mention some safety items as well, i.e.: be careful and get
assistance lifting and moving heavy items. Wear surgical gloves and keep clean,
old engine oil is very carcinogenic! Be careful around open fuel lines. Don’t
smoke or leave live wires hanging about. Keep the workplace free of oil and
junk, you don’t want to slip or fall. Secure the car whilst on axle stands. Yes,
it is all obvious but it’s the stuff that will hurt you.
Additional Tools
Flywheel pullers, clutch alignment tool, usual sockets and spanners, hammers, punches and
screwdrivers. I found lever bars handy and impact sockets also. You will need a
good torque wrench. A can of WD4O and loctite thread lock. Methylated spirits
for cleaning and degreasing. Also stacks of rags!
Thank you, to Heather (my wife) and her Mini for keeping me mobile. Dennis, John and
Dad for your help with the heavy stuff and technical reference and also Alan
Jones for your help and encouragement at the other end of the phone.
ALSO..
Now having had the car on the road for a couple of months I would like to add that
the conventional starter motor works but is a bit of a squeeze to get under the
manifold. I have removed the heat shield from it, so far without detrimental
effect to the starter motor, but the MR2’s wiring loom is a tad short for this
motor. This is because the electrical terminals are in a different position. I
could have had a bit of a fire or even had the battery explode! This was due to
the main power supply cable to the motor being stretched and then chaffing
between the exhaust manifold heat shield and starter shield causing a short circuit.
The symptoms of which was a totally flat battery. Once charged and reconnected the
battery began to fizz and get a bit warm!! Anyway I chopped and insulated the
damaged cable, then replaced it with one I made from heavy-duty cable and terminal fittings.
The other niggle has been the coolant bleeding, it seems it takes a few goes to
bleed properly. Bleed it, drive it, bleed it, drive it, etc. Also noteworthy I
think is the fact that the whole engine change may have possibly been caused by
the failure of the radiator cap seal. My reasoning for this is that if the seal
is perished it will allow air back into the cooling system when the engine cools
down. My radiator cap seal didn’t look too good!
Just a final word on coolant and “Forlife”. Toyota recommends “A good brand of
ethylene-glycol base coolant mixed in accordance with the manufacturers
directions”! That comes from Paragraph 3 page 00-8 of the Toyota 4A-F, 4A-GE
engine repair manual Pub No. RMO63E. So use of Forlife is not essential!
MARC PALMER
Tech Advisors Footnote-
Marcs' article is such a good read, all I can do is add emphasis to some
of his problem points-
Original engine failure cause - cooling system problem and head gasket
failure. This is so often the case - correct coolant bleeding and quality is
vital to try and avoid this.
I have said this before but make no apologies for repeating it again-
Toyota 'Longlife' coolant is good but not essential - but use a good
brand antifreeze and change it religiously every 2 years minimum.
The newer 'premium' propylene glycol antifreezes are better, but I'd
still change them at 2-3 yearly intervals.
It’s the anti-corrosion additives that are the key factor - they get
depleted by dissimilar metals. On such a large and complex cooling system as the
MK1 where the head gasket is the weak point - use good branded antifreeze - and
change it every 2 years.
Final PS to Marc - apologies for delay in publishing - totally my fault
caused by abject slowness in doing my own articles.
ALAN JONES
CLICK ON THE IMAGES TO ENLARGE
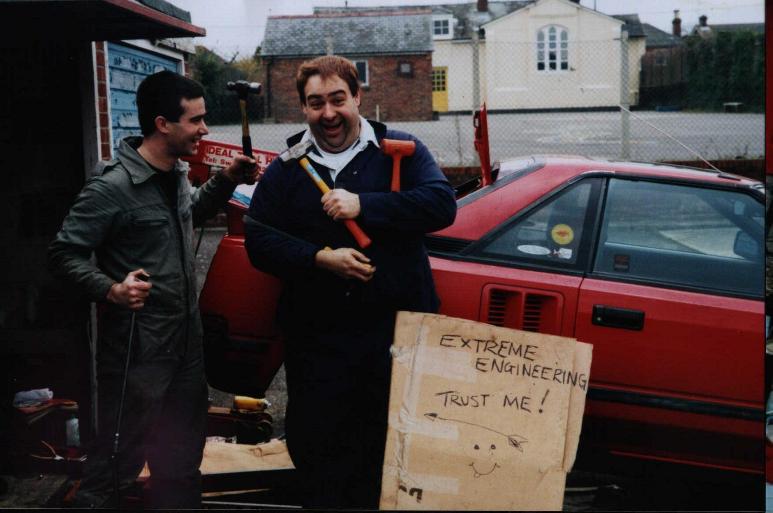
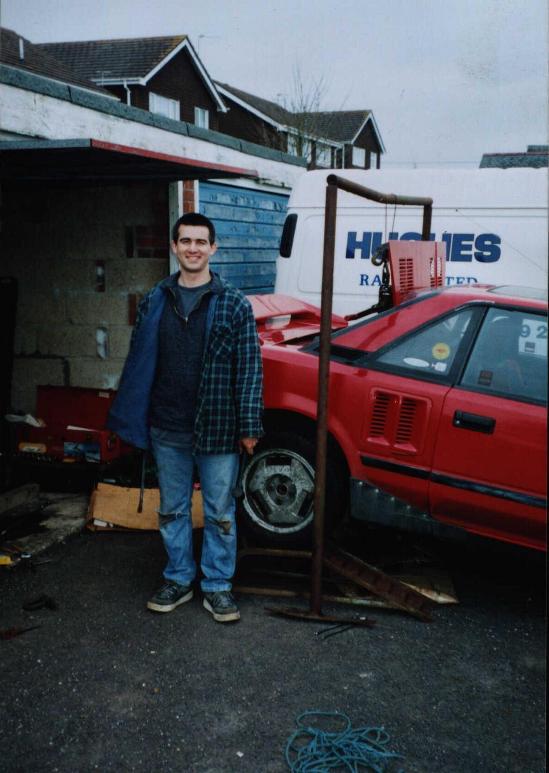
MARC AND
DENNIS 2 HOURS TO REMOVE
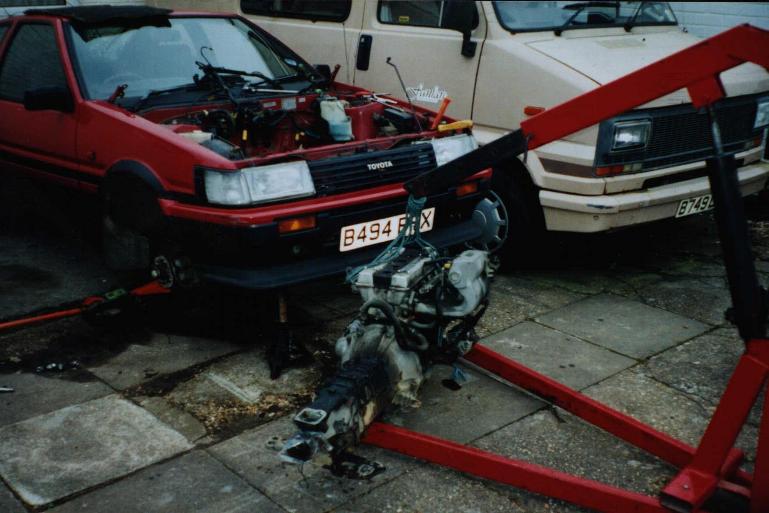
COROLLA ENGINE BEFORE STRIPPING
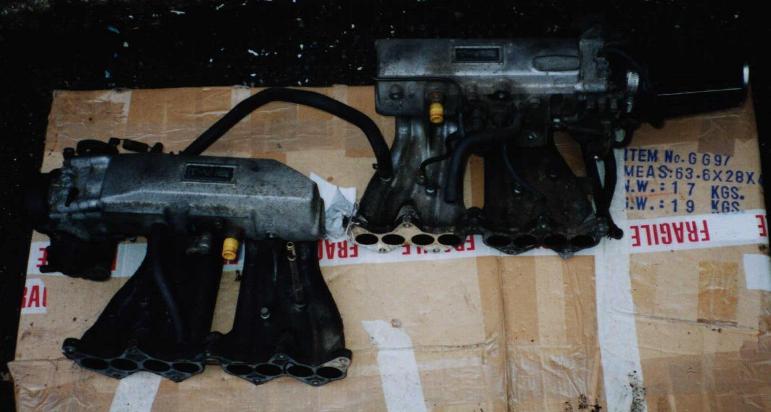
THE BIG BITS
REMOVED GRANDDAD'S 40 YEAR OLD
FRAME
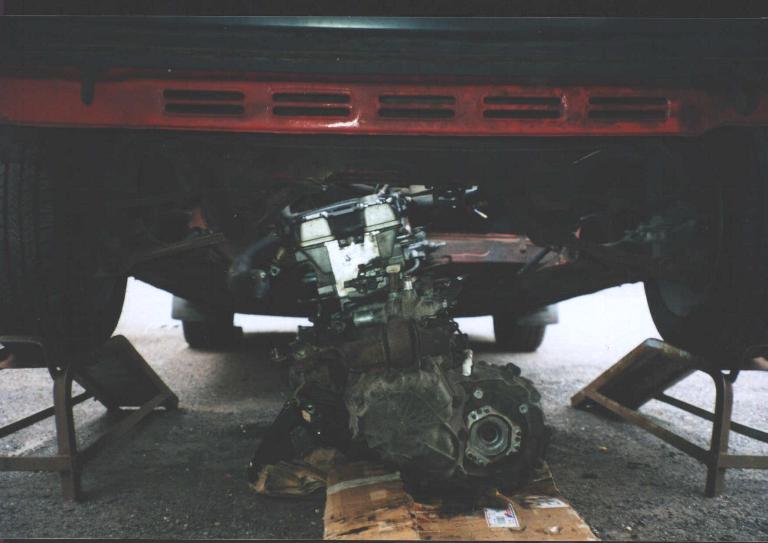
JACK IT UP
DOWN THROUGH THE
BOTTOM 8 HOURS
LATER
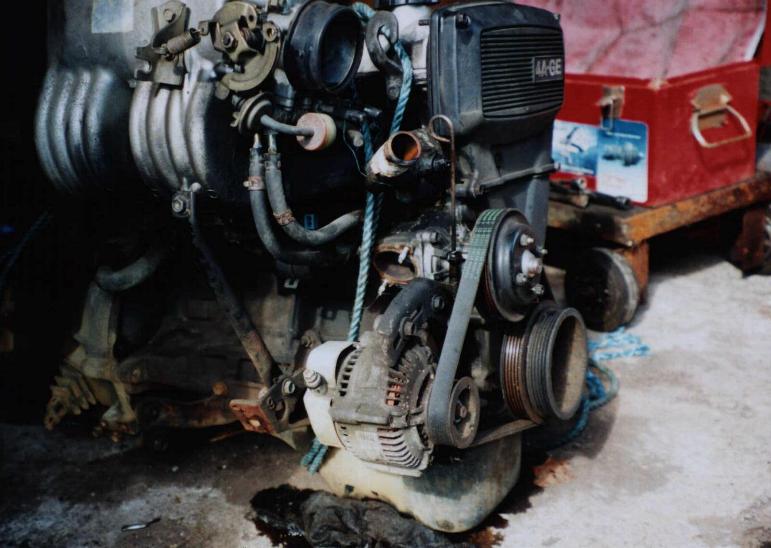
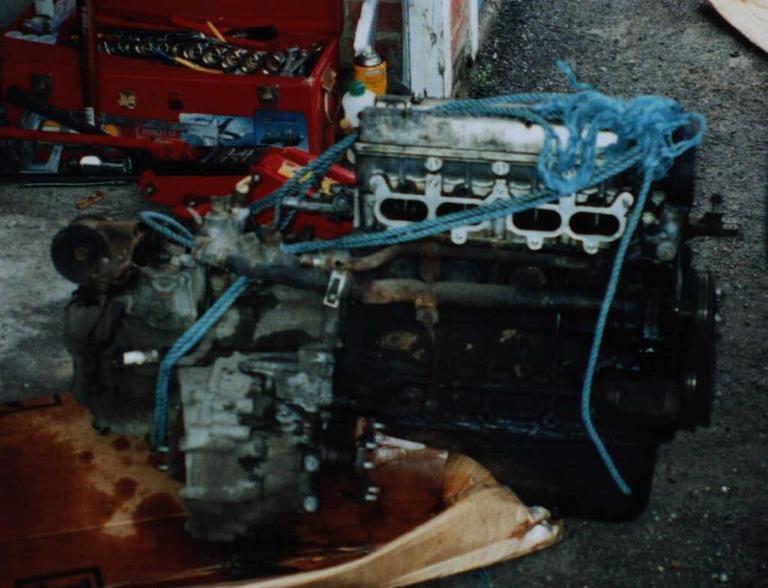
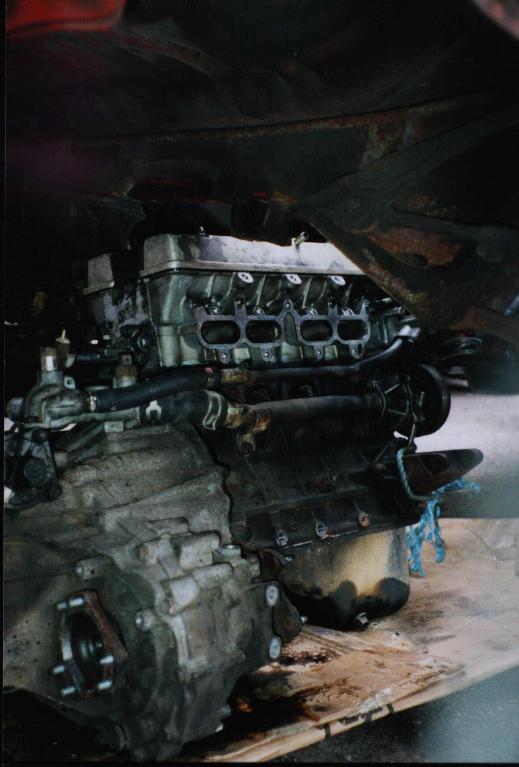
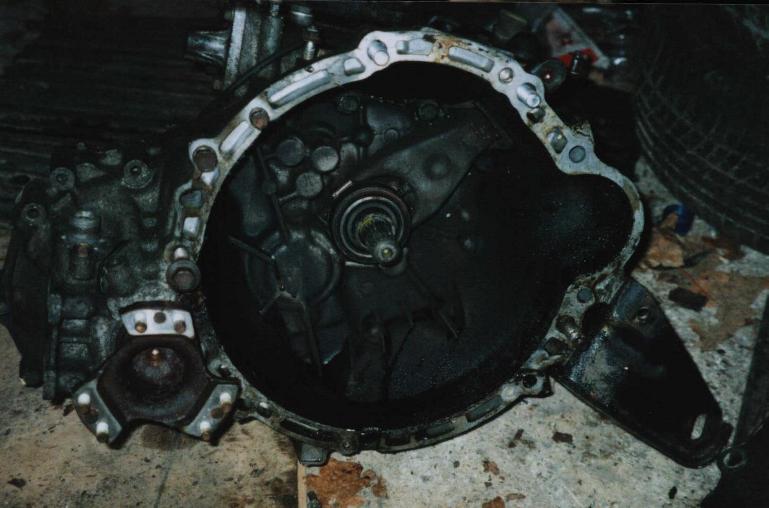
MR2 GEARBOX
COROLLA
GEARBOX COROLLA LEFT MR2
RIGHT COROLLA TOP MR2
BOTTOM MR2 LEFT COROLLA
RIGHT
Member Mark Hemingway has a 1985 MR2 which had done 120,000 miles when he blew the
original 'blue top' engine accelerating on a dual carriageway. As the engine had
done few miles, he didn't think it was worth repairing (who knows what would go
next) so he bought a later spec 'red top' engine from Fensport. These engines
have only done typically 30-50k. The engines are £375 plus cambelt, oil filter,
carriage and vat which was a total of £522.
Mark got a local garage to replace the engine and was charged £290 for labour, but
also had to pay for gaskets, antifreeze, oil, thermostat, new clutch (might as
well while the engine is out) which was a total of £461 inc. VAT.
Total cost was £983, now Mark has one of the first MR2's in excellent condition and
rare colour (sky blue metallic) which is also mechanically sound. The car feels
really good, starts first time and had no more engine trouble.