COOLANT REPLACEMENT
The MR2 is particularly prone to damaging corrosion if the
coolant is not regularly changed. There are two pipes that run under the car to
carry the coolant from the radiator to the engine, and pipes going to the heater
unit. If the coolant is not regularly changed (once a year is recommended), then
these pipes (along with the engine and radiator) are prone to costly corrosion
damage. If the coolant is rusty in colour, then it definitely needs changing,
preceded by a thorough flushing.
Bleeding the system is complicated, follow the instructions below and you
shouldn't have too many problems. If you car 'hunts' at idle (revs going up and
down) then there is most likely air in the system. Bleed the system again. Also
check the system a few days after changing the coolant, as more air will work
its way out of the system.
Use any well known make of ethanol glycol antifreeze, which also contains the
necessary rust inhibitors. The manual recommends a 1/3 to 1/2 mixture. The total
volume of the coolant system is approximately 12 litres, so you'll need 4-6
litres of coolant - the balance is made up of tap water. So, how much to put in?
The more coolant, the more corrosion resistance. But coolant doesn't have such
good cooling qualities, which is why the water is required. So if you have
overheating problems, use 4 litres (although you should really be finding out
why the car is overheating).
All the above is OK in theory but many owners have
discovered that after changing the coolant the engine revs will rise and fall
alarmingly. This is often due to air being trapped in the system and causing the
temperature sensors to send conflicting information to the ECU. It is often
necessary to top up the system several times following a coolant change, so
carry a bottle of coolant/water mixture in a plastic bottle in the boot and top
up until the system stabilises. Depending on the length and frequency of car
journeys it can take a long time for things to settle down.
If you are carrying out a coolant change on an MR2 that has been neglected,
the old coolant may be quite dirty in colour. In these circumstances it is a
good idea to flush out the entire system thoroughly before refilling with fresh
coolant.
Club Chairman Stuart Kynoch's supercharger has had a problem with the cooling
system for some time now, the water is very discoloured and endless gentle
flushing has yet to cure it. We think that this is possibly due to the car not
being filled with antifreeze/coolant when it was used in Japan. In trying to
cure it we have tried some novel ideas, including the use of an electric tyre
pump connected to the front radiator and heater bleed valves in turn to agitate
and force out the water, and even using washing up liquid to try and dislodge
sediment in the system. Recently we decided to adopt a more heavy handed
approach, after disconnecting the two hoses connected to the engine block and
thermostat housing a long bottle brush was poked around inside to dislodge any
crud. Then the big guns were brought to bear in the shape of the garden hose,
this was connected to the hose disconnected from the block and the bottom
radiator drain tap was removed entirely. With the water pressure gradually
increased up to full pressure a lot of sediment was flushed out, this seemed to
be a mixture of rust flakes and calcium carbonate deposits. ( the kind that furs
up your kettle ) which seemed to be the reason for the larger diameter coolant
hoses in the engine bay feeling “crunchy” when squeezed. It took a very long
time for the flushing water to run clear. If this has cured the problem it will
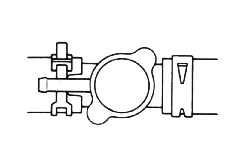
not be necessary to remove the radiator. As the hose clips used on the MR2 never
seem to seat back properly once disturbed, make sure that you obtain some proper
British jubilee clips to replace them. It is essential that the engine is stone
cold before using a garden hose in this way. Open and close the heater
temperature control several times and follow the bleeding procedure outlined in
the manual. Use ethylene glycol 50 - 70% strength, and remove and clean all
bleed taps checking and replacing any suspect rubber O rings. This is also a
good opportunity to check and if necessary replace the coolant filler cap and
thermostat. Finally the antifreeze/ Inhibitor should be changed at least every
two years.
Alan Jones's notes
Changing the coolant is not that difficult but it does take a bit of thinking
through - due to the multiple ‘hill and valley’ system, all with airlock
potential. (These high points include from front to back - radiator, piping,
heater, cylinder head). This is why there is a dire warning message on the
engine compartment cover, which refers to following the User Manual
instructions. This is fine but nowadays not everyone has got one!
Why is this important? - whilst a heater airlock might cause little more than
cold feet in winter, radiator and cylinder head airlocks in a MR2 have good
potential for at best poor running and at worst a blown head gasket and a warped
head - guaranteed to rapidly thin out your wallet! Very briefly a radiator
airlock can cause the engine to run too hot, and a cylinder head airlock can
both fool the ECU sensors and also cause local head overheating/warping.
Procedure - I have shamelessly lifted chunks of an article written by David
Harris in issue 2 of the club magazine - thanks David and I hope you don’t mind
this flattery!
Prewarning - do not start this job without reading through this full article
– and in particular the specific requirement for ‘service hoses’ which are
needed for controlled venting as mentioned in refilling section B below.
DRAINING
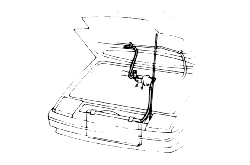
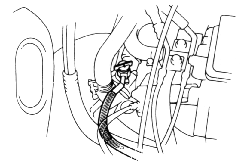
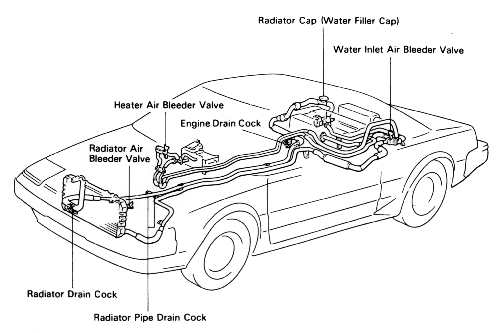
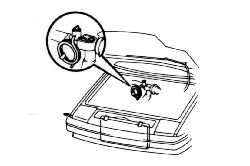
(1) Remove engine bay filler/pressure cap, set heater control knob to maximum
heat, open engine coolant vent valve above gearbox - white plastic wing nut.
(Toyota officially call it the ‘water inlet air bleeder valve’)
(2) Securely jack up the rear of the car, place axle stands for safety, and
remove engine splash shields. Locate the engine block drain cock near the oil
filter, and drain out as convenient.
This clearly drains the system - to this level but there are lower “valleys”
still to drain.
(3) Securely jack up the front of the car, place axle stands for safety,
remove the front splash tray, and locate the radiator drain cock - at the lower
o/s, drain out as convenient.
(4) Finally drain out the 2 main fore and aft coolant pipes - 2 cocks under
the footwell area.
This has finally drained the whole system - using virtually every low point.
(5) Flush through if desired - recommended.
I realise that this is a bit of a rigmarole - but it is the official method
for thoroughly draining the system. It also allows a close look at the system
plumbing to check the hoses and pipes for condition. In this don’t forget the
piping under the TVIS manifold - external corrosion is not unheard of.
(B) REFILLING - the trickiest bit.
(Preamble - cars are supplied as new with 2 plastic ‘service’ tubes for this
- located under the scuttle trim fitted to the rear of the front boot.) If they
have ‘gone’, then 6mm clear hose from the local DIY store is fine – 2 lengths
2ft long are needed.
(1) Select coolant - refer to other pages for selection article. (In brief
it’s clearly down to personal preference, but as an indication I will be using a
top independent brand at 50% for this winter.) Total system volume is 12.5
litres – i.e. quite a lot.
(2) Ensure all drain cocks are shut.
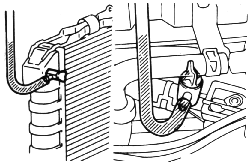
(3) Fit ‘service’ tubes to both radiator and heater vent cocks - and tie
their upper ends up to convenient bonnet and bonnet prop points. The key reason
for doing this is to ensure that when the system is refilled they act high level
vents - and their height ensures that no air can be sucked down them to spoil
the refill process.
(4) Commence fill of diluted coolant via engine compartment ‘fill cap” -
until coolant starts coming out of the engine bleed valve into the line up to
the overflow tank. Then shut this valve.
(5) Continue filling till the fluid is up to the fill cap neck. Check the
level in the 2 service hoses are at the same height.
(6) Shut the radiator and heater vent cocks. Remove the service hoses.
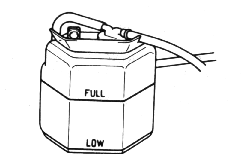
(7) Fill the overflow tank to the full level.
(8) Refit the fill/pressure cap - but only loosely to the first position
clockwise.This is just a vent position. Then run the engine at fast idle for 3
minutes. This runs the system at atmospheric pressure, which gives the best
chance for air to vent.
(9) Top the system up.
(10) Repeat steps 8 and 9.
(11) Fully tighten pressure cap, run engine and check for leaks – remember a
50% antifreeze is a pretty searching fluid!
(12) Refit undershields etc. and lower the car.
(13) Recheck levels after a short test run and top up as neccesary.
That’s it - if you do it yourself you’ll both save yourself some money and
get to check out the undercar plumbing!
ALAN JONES
COOLANT CHECKS
Although the risk of frosts is receding, it would be unwise to assume that the antifreeze has done
its annual work and can be safely ignored till autumn. It is equally tempting to
do any occasional summer top-ups with just plain water - but that isn’t a good
idea either.
Unfortunately the summer months are not a 'holiday season' for antifreeze. Whilst it might be
relieved of 'frost protection' duties, it still has to continue inhibiting
internal metal corrosion in the cooling system --which is just as if not more
important.
It`s the combination of dissimilar metals in the engine and cooling system along with
electrolytes in the coolant that cause the trouble - they act together as a
battery. This in turn dissolves the metals - with aluminium being particularly
badly affected.
Brand new antifreeze contains inhibitors to reduce this corrosion - but they do get
depleted over time, and then corrosion commences unchecked.
This might not sound too significant - after all what`s the loss of a bit of metal or even a
small leak? True enough - but it will be significant if the cylinder head gasket
goes!
The cylinder head is aluminium, the head gasket is a special steel, and they are in contact both
with each other and the coolant - ie together they make a battery cell if the
inhibitors are depleted.
In addition the gasket area between cylinders is very small, and subject to severe cyclic
stresses from the cylinder pressure and heat fluctuations.
So, if the antifreeze is depleted the head gasket is vulnerable to failure.
Also, given the age and mileage of most MK1's the head gasket has done a lot of hard service.
Hence it is no surprise that head gasket failures are increasingly being reported by members.
The failure symptoms and consequent repairs will be the subject of a forthcoming article,
but for here the subject is avoidance.
Regrettably, it is not possible to 'turn back the clock' for a gasket, so whatever damage has
happened is 'water under the bridge' and not reversible. Sensible driving,
including allowing the engine to warm up before imposing sudden or heavy loads
on it will obviously help, but an equally important thing is to keep the
antifreeze topped up to scratch.
Although I have written on antifreeze in an earlier issue, key points to re-iterate are-
1) Use a good branded antifreeze at around a 50% concentration.
2) An ethylene glycol (MEG) based product should be changed at least every 2 years. A propylene
glycol (MPG) type can go up to 4 years.
3) Keep some pre-mixed antifreeze for top ups.
Do this and at least you will have done your bit to maximise your head gasket life - not to
mention the rest of the system!
ALAN JONES
PASSING WATER – HOW HIGH UP THE WALL CAN YOU GO!
Sorry ladies, this one might be lost on you unless you are familiar with the toilet
scene in the ‘Full Monty’ film. I’m amazed what women can get up to,
literally! Three pints of lager and they can pass my ‘high-water’ mark! Was
it ever thus?
My excuse is age – what’s yours?
Moving swiftly on before I get asked too many embarrassing questions, the real subject
of this article is how to keep water in your MK1, not how to let it out. More
accurately how to do this with maximum efficiency and even increase engine
performance in the process, but that comes later.
On the relatively mundane side keeping it in is simple car engineering, well sort
of.
Like most modern cars the MK1 uses a pressurised water cooling system to take heat
away from the combustion chambers, if
it didn’t the engine would overheat and seize solid within a few minutes.
An uninterestingly boring ‘pub quiz’ fact is that about 60% of the energy
released by that increasingly expensive petrol goes out to be dissipated by the
cooling system to atmosphere, ie it heats up the local micro-climate and even if
you don’t give a toss about global warming it leaves a large hole in your
wallet!
Diesels are better in this respect as they run at far higher compression ratios and
temperatures, but even they can only reach around x thermal efficiency.
Why pressurised? Because the water can run hotter as the pressure increases the
boiling point. Why run hotter? Because the higher temperature increases the heat
transfer from the cooling system to the atmosphere. This means that the system
can be smaller to do the same job and hence cheaper to make, lighter, and easier
to fit into confined spaces. In other words its largely for the manufacturers
benefit not ours.
The downside is that when it does leak the water p---s out with gusto, which is
where I set the scene for starting this article!
Keeping it all in is largely a matter of having decent hoses and pipes, and in this
respect the MK1 has a rather large system, hardly surprising with a mid-mounted
engine and a front mounted radiator.
The hoses are much like on any other car, if you want to check on their condition
then do as the ‘actress said to the Bishop’ and squeeze them gently. If
there’s a slightly crunchy noise then either the hose is hardening and
starting to delaminate, or the actress is objecting and retaliating in kind by
squeezing other bits! Replacement hoses are available from the likes of Auto Jap
Spares or Fensport.
An extra feature on the MK1 is the metal pipework running underneath the body to
convey the water from the engine to the radiator and back. The heater also has
its own shorter metal piping. These are made of galvanised steel and do
eventually corrode through. These to my knowledge are only available from Toyota
which is why I keep my own strategic stock of good ones. A ‘quick fix’ if
the odd pinhole has appeared is to cut the pipe and sleeve the joint with a
section of rubber hose but it is a fiddly job.
The ‘radiator’ cap of course keeps the pressure in and the rubber sealing ring
can wear and harden with age. Replacements are available from almost any auto
store.
That’s the visible bits of the system dealt with, now for the internals. The most
obvious being the cooling water itself. Ironically this should never ever be
just water unless you’re looking for a head gasket failure and massive
internal corrosion. Even distilled water can cause damage unless it is
inhibited. The problem here is all the different metals in contact with the
water – the cast-iron block, aluminium head, copper radiator etc. These
different metals all have different electro-chemical ‘potentials’ and as
soon as the water picks up contaminants and starts to be ever so slightly
conductive the metals start acting as a battery. Admittedly an extremely weak
one, but enough over time for the most reactive metals to start going into
solution. In other words they corrode.
Aluminium is the most vulnerable and the gap between cylinders is very small, it doesn’t
take much corrosion for the head gasket to have all too little area to seal on
and hence lead to head gasket failure.
The way to minimise this risk is to have a decent antifreeze added to the water.
Apart from the obvious frost protection this contains special inhibitors which
stop this sort of corrosion, at least at first. Over time they get
‘consumed’ – that’s how they work, and once depleted the corrosion can
start again.
Hence the exhortation for regular antifreeze changes, not for frost protection but to
minimise internal corrosion.
What type and how often? Well Toyota’s own ready mixed ‘Longlife’ (used to be ‘Forlife’) is excellent if a
bit expensive. This can maybe last up to 4years, although I regard 3 as a
maximum, and 2 is better. On the other hand any decent ‘premium brand’ type
propylene glycol will do, as made by the major oil companies and available in
the likes of Halfords (whose brand I use.)
As to water I suppose distilled is best but it will be a bit expensive. I use
filtered tap water, at least a token effort. Don’t think I’d use rain water
as it is already potentially acidic from atmospheric pollution.
One other additive which I have yet to use is a “water-wetter”. These claim to
improve heat transfer and hence cooling efficiency by reducing the surface
tension of the coolant. I have heard that they are quite effective and suppose
they are useful for hard hot weather duty. Bit expensive though, at about £18
for a dose.
And finally to the bit I meant to talk about, the thing that gets this coolant
around, the humble water pump. This often neglected item lurks at the top of the
engine and is driven by the fan belt. They tend to be ignored because they
don’t often go wrong, although eventually the mechanical seal and bearings
start to fail, usually with a painful squealing noise. Sometimes the impeller
vanes corrode away particularly when anti freeze has been neglected for a long
time. This will be seen as a tendency to overheat in hot traffic conditions.
One thing about the MK1 is that the radiator is quite generously sized and is
copper. I have never yet heard a radiator fan cut in. Some brave souls have even
removed the fans totally without problems although I’d hate to be stuck in a
major motorway jam in really hot weather. (If you mean me, Alan, stick the
heater on! – Editor)
Back to the pump, effective though it is, it is not very efficient as the flow and
power consumption increase dramatically with engine speed. I’ve long since
forgotten but think that the flow goes up by the square of the pump speed and
the power by the fourth. The pump is designed to give adequate circulation at
idle when the car is stopped, which means that under high revs the pump flow and
power is way too high. Considering also that at speeds above 30mph there is a
good cooling airflow through the radiator, the pump is just needlessly wasting
power, probably about 8 BHP on a MK1. In fact at motorway speeds the pump just
needs to be gently ‘idling’.
One possible solution is a ‘viscous’ pulley which slips at speed, but these never caught on.
The other is to dispense with the mechanical pump completely and go ‘electric’.
I have seen one such installation on a MK1 and it seemed to be very effective.
Basically the pump is removed and a blanking plate fitted. (The pulley also goes so a
shorter fan belt is needed.) The electric pump is fitted in the hose low down in
the passenger side of the engine compartment, and controlled by an electronic
controller which senses the coolant temperature, so that the pump only comes on
when ‘demanded’ much like a central heating pump. They are Australian made
and suitable for most cars, and seem to have a good reputation. Available from
the likes of Fensport or Demon Tweaks.
I have one but have never had the time to fit it.
So if you want a few more BHP with no increase in fuel consumption this could
appeal to you. If anyone has actually fitted one just let me know and we can
publicise it.
That’s it folks, it’s impossible to write one more word about anything as common as
water, but it is quite important!
ALAN JONES
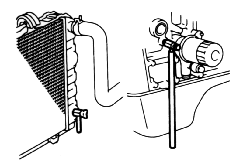
Drain coolant by:-
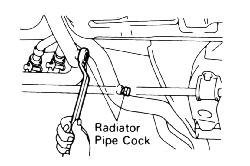
Replacement of Engine Coolant
